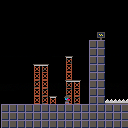
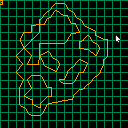
Basically, I’m working on a digging game and am revisiting something I have worked with in the past: marching squares. I recommend looking it up, but basically the way it works in this project is for each “tile” a table of tables is examined and depending on whether each of the tiles coordinates are on or off the algorithm figure out which sides does the line on the square intersect. Sometime marching squares also uses linear interpolation, but since my screen is stored in binary instead of floating point values I am storing intersection points in separate nested tables. The main thing is that each square is checked, and depending on stored values a specific line might be drawn through it.
Colour Reference
A simple and small colour reference utility intended to be ran as a widget, but can still be ran windowed.
Think I'm mostly done with this app now as of v3.0. I have one more idea but I'll probably take a break before doing it and try and move onto something else in the meantime. I have what I want now to help with my development and learned a lot on the way too, hope this app can be useful to you too.
Widget install instructions
To add to your tooltray as a widget add the following line to the /appdata/system/startup.lua
create_process("/filepath/to/Colours.p64",
{
	window_attribs = {workspace = "tooltray", x=0, y=0},
}) |
change "/filepath/to/Colours.p64" to wherever you save the cart on your system.
I would recommend saving it as /appdata/tooltray/Colours.p64
Customisation
When ran as window the look of the app can be changed via the hamburger menu. To apply the same level of customisation when ran as a widget you can use the following arguments to do so:
-
Chromatic - Change the ordering of the colours to
be more reminiscent of the editors -
UseDarkText - Instead of the default way to render
the text colour on light coloured cells, it will
use a single darker colour for all light coloured cells. -
Vertical - Rotates the orientation to be vertical
- BigFont - use the standard Picotron font rather than
the smaller Pico 8 font that this app uses by default.
(For the following options, replace # with a number)
-
XSize=# - Specify how wide you want the cells to be.
Default value is 9, 2 pixels are added when in BigFont
mode. 9 should be considered the smallest, otherwise
the font won't align. - PaddingSize=# - Specify the extra space in the middle
'trough' of the palette. Default is 2. When in vertical
windowed mode, if the overall width of the palette is
less than 32, the padding will be increased to
accommodate. This limitation is ignored when used as a
Widget.
example of create_process command with args:
create_process("/appdata/tooltray/Colours.p64",
{
  window_attribs = {workspace = "tooltray", x=0, y=0},
  argv = {"UseDarkText", "Chromatic" "PaddingSize=4"}
}) |
The order of the args does not matter
Changelog:
v3.0
- Added Chromatic ordering that changes the orders of the colours to be more reminiscent of what you see in the editors. This can be changed in the windowed version in the hamburger menu with the
Change Orderingoption, and can be done for the widget with theChromaticarg. - removed un-needed files from the cart (Actually this time -.-)
v2.3
- Implemented parsing of args for customising the look of the app when installed as a widget.
v2.2
- Reimplemented the original default (larger) font version. Changeable via the
Change Fontoption in the hamburger menu.
v2.1
- Fixed an issue with the padding of the vertical mode persisting when reverting back to horizontal.
v2.0
- Added Vertical mode - accessed in windowed mode via the
Change Orientationoption in the hamburger menu. I imagine this will be useful if using a Windowed editor like SLATE rather than the standard fullscreen one. - Exposed option to change the way the colours over the light colours are done with the
Change Dark Text Stylein the hambruger menu (I will make this an arg at some point so it can also be done for when it's a Widget).
v1.3
- fixed bug where window was still resizeable (thanks OniriCorpe)
v1.2
- cleaned up some code, removed previous now unused experiments etc.
- added comments to code in case people use the code as reference or learning
- added Widget instructions (same file you can see in cart image) into the cart itself
v1.1
- Changed the font to the Pico 8 font to slim it down a bunch more.





I made this tool for myself, for reordering levels to fix difficulty curves. But I thought I'd share it in case anyone else finds it useful.
How it works:
- Press X to select a room, and then X again to swap the two rooms
- Press C to preview a room
- Maps are imported/exported manually using
cstore. Cry about it :(
Note: Mapshuffle cannot import/export maps in the web player. You must download the cart and use it in immediate mode.
Instructions:
- Back up your project in case something goes wrong.
- Download mapshuffle.p8 and place the cart in the same folder as your project.
- Open your project, type the following line into the terminal, and hit enter:

people often ask about object orientation (OOP) and inheritance, but can get confusing or incomplete guides. I want to help everyone understand how prototypes work!
lua does support object-oriented programming (but does not require it), based on prototype inheritance — not classes.
metatables are part of this but also often misunderstood. this is a complete explainer that I wrote on discord and keep not putting here in a clean way. so I am putting it here as it is!
so what is a prototype?
goblin={
 sp=42,
}

function goblin:new(x,y)
 local obj={x=x, y=y}
 return setmetatable(obj, {__index=self})
end

function goblin:draw()
 spr(self.sp,self.x,self.y)
end

gob1=goblin:new(40,40)
gob2=goblin:new(60,70) |
alright so this is like 6 different things working together.
1) table with methods: goblin is a table with property sp and methods new and draw (a method is a function attached to an object)
calling goblin:new(40,40) is the same as goblin.new(self,40,40); self is «the object we are working on»; defining function goblin:draw() is the same as function goblin.draw(self) and the same as goblin={sp=42, draw=function(self) spr(...) end, somethingelse=true}
there is a difference between the two methods in my example: when we call goblin:new, the self param inside it will be the goblin table itself (the prototype), but when we have gob1:draw() then self inside draw will refer to gob1.
2) metatables. there are special methods that lua uses to implement operators (+, /, .., etc). the method for addition for example is __add (we call these metamethods). if I want to be able to do vector1 + vector2for my custom vector tables for example, I need to define a method named __add but I can’t do it in the vector prototype table, lua will not look it there; it is required to define these metamethods in a table’s metatable. (the metatable is similar to a class in other object-oriented languages: it is the template, or the definition, or the model for many tables.) so that’s what happens in goblin:new: I define a metatable with one metamethod and set it on my goblin object.
3) prototype. these are great! if I have 50 goblins on screen and they have different health and coordinates but the same properties for sprite, width, height, etc, and the same methods for update, attack, draw, etc, I would like to define all the shared things in one place, then have custom things in each goblin table. that’s what a prototype is for! here in goblin example we have sp and draw shared, and in a specific goblin table (it starts as obj on line 6, then it’s gob1 or gob2 in my example) we have specific data like x and y.
much more info on this really useful site: https://gameprogrammingpatterns.com/prototype.html
alright so how do I say «gob1 and gob2 should delegate to goblin prototype for some properties»? I define a metatable with an __index property. it is called by lua when I do gob1.sp and sp is not found inside gob1. it can be a function (can be useful to have a dynamic property that’s computed from other properties) or another table: the prototype!
more: https://www.lua.org/pil/13.4.1.html
now this is the cool thing with prototype-based object-oriented language that you don’t have in such a nice way with class-based OO languages
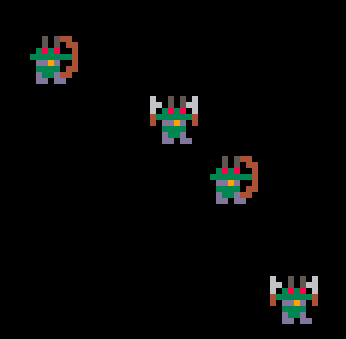
what if I want 40 goblins on screen and 10 archer goblins? these should have a different sprite and different attack method.
archer=goblin:new() archer.sp=52 function archer:attack(target) --use the bow end arcgob1=archer:new(20,50) arcgob2=archer:new(40,70) |
look at this from bottom to top:
arcgob1.xwill be 20,y50- arcgob1’s and arcgob2’s prototype is
archer, because when we callarcher:new,selfon line 6 of my first code block points toarcher arcgob1.spis 52 (the value comes from the prototype)arcgob1:attack(hero)will use ourarcher:attackmethod.arcgob1:draw()will usegoblin:draw! archer itself is a table that has goblin for prototype
drawis not found in arcgob1, look at its prototype archer, not found, look at its prototype goblin, found! call it withselfpointing to arcgob1.
result:




Greetings,
I'm relatively new to the Picotron and even though it is a "fantasy workstation" I was wondering if there was a way to use it as an actual OS specifically for the Raspberry Pi. If anyone knows if there is a way to use it as an ISO for a Raspberry Pi I would love to get some info as to learning how to make it it's own OS.

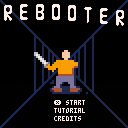
--REBOOTER--
Ordered by Elevated Recovery
Made by Charlie Boudchicha (https://www.fiverr.com/charlie_boud)
You need to complete every achievements to win the game :
- make a bad decision
- make a productive decision
- do something to rest
- unlock the 4 blue rooms
- go through 15 rooms
- survive 3 trap rooms




Hello, considering the following:
Trying to remake Vampire Survivors and a fun project
I have a character class
Characters have effects that are applied to a target. In this example my target = player
I have a character that is an instance of that class. Let's call him "Antonio"
I have a "run", Antonio is copied into run.player
I set player to be run.player
My problem is that I have to initiate the character class and Antonio before I create "player". But player is not yet created so player referenced on the character class is nil.
I hope this makes sense, I have a workaround but it feels clunky and I'm wondering if there are other solutions.
Here is my code before the workaround:
character = {}
character.__index = character
function character:new(name)
	local o = setmetatable({}, character)
	o.name = name
	o.x = 0
	o.y = 0
	o.sp_scale = 1
	o.w = 16
	o.h = 16
	o.effects = effects
	o.original_invincibility_frames = 10

[ [size=16][color=#ffaabb] [ Continue Reading.. ] [/color][/size] ](/bbs/?pid=147242#p) |


I've been using this tutorial as my principal information for programming, since there's no picotron specific resource.
I'm experimenting with table-based classes, according to the guide I'm supposed to be able to create a base blueprint of an object and then instantiate it, but when I do so following the example, the object is not copied but instead it becomes a reference, because every change gets applied to the first object.
I made a sample project, first I try the guide's way, then I try it in a way I know works
enemies = {}
enemies2 = {}

enemy = {
	type = 0,
	sp = 1,
  	x = 0,
  	y = 0,
	dx = 0,
	dy = 0,
  	update=function(self)
    self.x += self.dx
    self.y += self.dy
  end,
	draw=function(self)
		spr(self.sp, self.x, self.y)
	end
}

goblin = enemy --copy enemy class
goblin.sp = 2
goblin.type = 3
goblin.x = 6
goblin.y = 10

ogre = enemy  --copy enemy class
ogre.sp = 3
ogre.type = 4
ogre.x = 40
ogre.y = 50

function _init()
add(enemies, enemy)
add(enemies, goblin)
add(enemies, ogre)

add_enemy(16,16,4)
add_enemy(32,32,5)
add_enemy(64,64,6)

end

function add_enemy(new_x,new_y,sprIndex)
	add(enemies2, {
	type = 0,
	sp = sprIndex,
  	x = new_x,
  	y = new_y,
	dx = 0,
	dy = 0,
  	update=function(self)
   		self.x += self.dx
   		self.y += self.dy
  	end,
	draw=function(self)
		spr(self.sp, self.x, self.y)
	end
})
end

function _draw()
	for e in all(enemies) do
		e:draw()
	end

	for en in all(enemies2) do
		en:draw()
	end
end |
If I define the object in the add function then each object acts as independent object, is this how tables are supposed to function?


 2 comments














.png)
