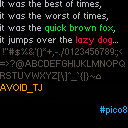
Inspired by LRP's lowercase font, I made a little library that lets you print to the screen using a custom 9px variable-width font that is defined entirely in code. In other words, nice and readable text that doesn't use sprites. The cartridge includes the hastily coded example usage you see above.
What's included:
init_print9

    initializes font data, must be run before print9() can be used

print9 str [x] [y] [col]

    prints to the screen using a variable-width 9px custom font
    if x or y are left blank it will continue printing where it last left off
    col is text color

    optionally returns the x-coordinate of the cursor, which is useful if you
    want to continue where you last left off (for example, when typing one
    character every frame)

    do note that print9() uses up a reasonable amount of cpu, typing out the
    entire lowercase alphabet uses up about 10% of the cpu @ 30fps
    my suggestion for longer text (i.e. dialogue boxes) is to draw to regions of
    the screen that are not cleared every frame and only clear when necessary

is_bit_set var pos

    checks if the pos-th bit (including fractional part) in var is set or not
    used internally by print9(), but hey, it's a nice utility
|
With all (non-extended) characters defined, this library uses up 847 tokens. If you are desperate for tokens, it works perfectly fine to remove the definitions for characters that you don't need, for example only defining lowercase characters + punctuation can cut it down to ~450 tokens.
Explanation for how the characters are defined:
[hidden] The font data for each character are tucked away in regular Pico-8 numbers treated as bitfields. The bitfield is divided into two parts - an 11-bit header and a variable length body used as a binary bitmap. Here's what the data for the letter "e" looks like on a binary level: |

This would be perfect for some great text adventure games.
Nice going, Qbicfeet !

I haven't peeked under the hood, can we design fonts for it? Is it all done with draw commands?

HotSoup: Each character is drawn with pset, one pixel at a time. The data for each character is stored as a number value that is treated as a bitmap. There's a little more explanation at the top of the other thread, although qbicfeet has extended that method to support much larger characters.
The other thread also has a Font Maker cart for converting your own characters from the sprite sheet to numeric bitmaps (although it's limited to the 4x8 size that I originally started with).

@HotSoup: Yes, you can design your own fonts and like LRP said, it's all done using pset. I added an explanation for the font data in the opening post, hope it's descriptive enough.
If there's interest I could make a small tool that generates the character data characters using sprites as input. Is that something anyone would be interested in?

QBicfeet, if you do this, you won't need to save the character length in pixels. If you left-justify your font, all you have to do is scan each 8x8 element from right to left (1-8) and record the length in an array for that character once you hit a non-black pixel.
The advantage is, ANYONE can build their own font with your program by changing only the image table and not have to worry at all about manually entering the pixel-length across for each character. :)

I'm not entirely sure what you mean, how would the data be structured code-wise, then? Wouldn't using a static 8x8-size field (if that's what you mean) use up a lot more tokens?

I could write the code, but I don't want to take your fireworks because you've done so much in here already. :)
I'll doodle a little of it.
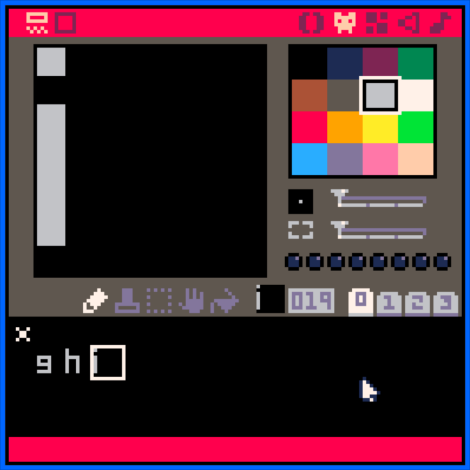
Notice how each of these 3-letters in the tiles are left-justified ? There are 3-letters in this example.
Letter "g" is 4-pixels across. Letter "h" is 4-pixels across, and watch out now ! Letter "i" is 1-pixel across.
What you want to do is scan the 8x8 tile area for each character, from the rightmost pixel to the left and STOP when you hit a pixel that is not black.
That then is the recorded horizontal length for that character - it is right where you found a non-black pixel.
Save that to your character array. So to start, in the tile area, doodle up say 96-characters from SPACE to Exclamation Mark to Question Mark to Uppercase Letters to Square Bracket to Lowercase Letters to Tilde, and you are all set !
Then anyone can easily load up your cart, change the tile table to their liking for a custom set, or use the one you've drawn yourself, and then run your program to display perfectly proportional text, as you have already done so in your code.
BUT they won't need to manually type out in a table as you have earlier done the length for each character as your clever code will already scan each character's size and do this for them. Do you see ?

Ooh, I see what you mean now, I got a bit confused there and didn't get that you were talking about a font builder (thought you meant using it as a new font data structure in the main program).
That's a really great idea! I could definitely do something like that, it would be really intuitive and make it easy to edit and share new fonts. Thanks for the tip!

Glad to help and and Good luck ! I guarantee someone will use it. =ME= for instance ! :)
Especially if and when a QWERTY keyboard input is added. Your proportional font will look great for some devilishly puzzling text adventures I've written in my time.
"Professor Twist's Tome"
"Idol Of The Nile"
"Dracula's Castle"
"Orbs Of Ankhar"
"You are at the intersection. A bridge crosses a stream to the North and a twisted path runs to the East."
"You see: Tree Branch, Gold Coin."
"Exits are North, East, and South."
"Lift Grate"
"Climb Tree"
"Open Drawer"
"Get Key"

Broken now.
But can be fixed by replacing the "shl" in "is_bit_set" with "rotl"
[Please log in to post a comment]



 To be able to store more data than can be contained in a single 32-bit number we split each character up into table items, so that when we reach the end of the first item we can simply jump to the next:
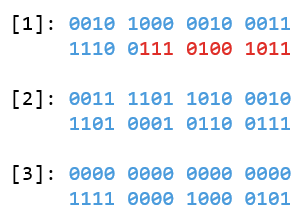 Let's look at the header.
If the 0th bit is set, the character has an ascender.
If the 1st bit is set, the character has a descender.
A character that has neither an ascender nor a descender is 5px tall. A character that has an ascender extends 2 pixels upwards and adds +2px to the total height. Likewise, a character that has a descender extends 2 pixels downwards and also adds +2px to the height (a character can have both an ascender and a descender, which makes it 9px tall).
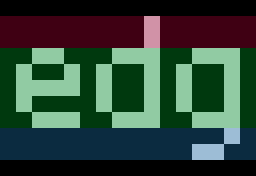 The following six bits (2 through 7) are what I like to call "kerning data" and tell us whether the character "sticks" out in the top (ascender, red in the above picture), center (green) and bottom (descender, blue) regions on either side of the character: bits 2 through 4 for the left side and 5 through 7 for the right side. Let's use lowercase "d" as an example:
bit 2 = 0 because the left side of the character does not occupy the top region
bit 3 = 1 because the left side occupies the center region
bit 4 = 0 because the left side doesn't occupy the bottom region
bit 5 = 1 because the right side occupies the top region
bit 6 = 1 (right side occupies the center region)
bit 7 = 0 (right side doesn't occupy the bottom region)
When print9() prints a character to the screen, it compares the left side of the character to be printed with the right side of the previous character. If both characters have parts that occupy the same regions (for example, "E" and "B"), there will be a 1 pixel gap between them, but if there is no match ("T" and "e") there won't be a gap (0 pixels).
Let's continue looking at the header: bits 8 through 10 is simply a 3-bit number (0~7) that determines the width of the character plus 1. In other words, this means that a character can be anything between 1 and 8 pixels wide. The character "e" in the topmost image has these bits set to 011 = 3. Add 1 to that and we get a 4 pixels wide character.
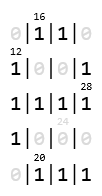
The body is a very simple bitmap structure that runs from top-to-bottom, left-to-right and tells print9() whether to draw a pixel (1) or not (0). Because we already calculated the height (5 px + 2 if asc + 2 if desc) and width (1 + value in bits 8-10) by looking at the header, the function knows when it's time to hop to the next vertical line and when it has reached the end of the character. If we reach the final bit of the first number we simply jump to the first bit of the next item in the table (as described earlier) (as a bonus, Pico-8 doesn't crash if we use binary operations on a nil value, meaning that if a character wraps over into a second table item but there's no data that needs to be defined in it (all zeroes from here on out) we don't need to define it and save some tokens. Woo!).
To simplify, here's the bitmap for the character "e" from the earliest example and how the function treats it:
 That's it! That's all you need to know to create your own characters. My suggestion is to first map out your characters in the Pico-8 gfx editor, then use some calculator with a bit toggler (Window 10's default Calculator has one if you switch to programmer mode) to map it all out and get a hexadecimal number.
If you want to create characters that are more than 8px wide or with heights that aren't 5, 7 or 9px you will have to modify the print9() function itself, but you can probably figure out how to do so yourself (if not, feel free to ask and I'll try to help!).
[/hidden]~~~~~~~~~~~~~~~~~~~~~~~~~~~~~~~~
Licensed under [WTFPL](http://www.wtfpl.net/faq/) (Do What the Fuck You Want to Public License). Use it, modify it, trash it... do whatever you want. I'm just happy you took the time to take a look at it at all.
If you use it with one of your cartridges, or make any changes to the program to optimize it or make it suit your needs better, please let me know, I'd love to see what you do with it.