
Or you could read that subject line as, "No Objects For Noobers."
For those of you confused or confounded by Object-Oriented programming, you might be happy to know that PICO will also accept the standard spaghetti-code variety. That is where there are no system interrupt or timing routines.
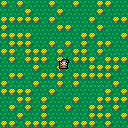
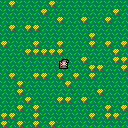
How do I use a single tile to create a perfect black outline around a sprite that is already 8x8 pixels in size ? You'll have to look at the code to find out. :)
Based on DittoSlash's test cart.

I couldn't resist wrapping the code with the "proper" _init() _update() _draw(). At this point it doesn't make a big difference. When you start drawing multiple layers of game and ui and especially if you ever drop to 15 fps, having draw calls spread out is asking for hassle.
The only thing that really got reordered was the input. Otherwise, the code is basically the same. (well, besides all the tweaks I list below)
changes:
Mostly I did all this for fun and because I have spare time waiting for gigs of files to copy. (and in case it helps anyone with the built-in functions)
edit: [pedantic] Object oriented is classes and inheritance. This is just using the 3 built in functions to categorize/run things[/pedantic]

I like what you've done here, Tyroney !
I was afraid of resetting all the colors to black thinking it might affect the screen or cause a flicker - clearly it does not.
Interesting idea causing the player to shudder going over the flora tiles.
I hesitate to use the mapping space because I know at some point it cuts into the graphic tiles.
I'm also forgetting that any variable containing an integer value can at any point be promoted to floating point with a decimal.
In this case, X & Y. It would never have occurred to me to add .5 to make it move half speed as I already targeted it as an integer variable.
You are mentioning that object-oriented is classes and inheritance. Could you please post a SMALL example of this ?
And you are saying that perhaps _Init(), _Update(), and _Draw() are not ?
There's quite a bit I can learn from the code you've posted thus far on the reissue of my demo.

If someone's real picky, what I added next isn't "object oriented", but I'm not here to discuss that.
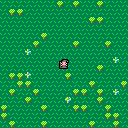
So I tossed in some floaty things that could be pickups or something. Starting with the last bits I added which are easiest to explain:
in _init(), there's a new timer and the adding of the things to the things table:
--timer
	t=0

--floating things?
 things={}
 for i=1,5	do
 	add(things,newthing(4,flr(rnd(15))*8,flr(rnd(15))*8) )
 end
|
in update, at the top the timer gets incremented and resets at 30
t=(t+1)% 30 |
and later on I update the new things
for i in all(things) do i:update() end |
Super simple! Because I've got the magic going on in a new function down at the bottom: (hopefully commented sufficiently)
function newthing(s,x,y)
--[[make and return a new thing
sprit s at x,y. i didn't know
what to call them, but they're
floaty-looking]]

	local thing={}
	thing.s=s--sprite
	thing.x=x
	thing.y=y
--[[floating effect has a list
of offsets, a counter, and a
random offset for when it does
its floating]]
	thing.floaties={[0]=-1,0,1,0}
	thing.float=flr(rnd(4))
	thing.r=flr(rnd(4))

	thing.update=function(this,...)
		if (t+this.r)%5==0 then --every 5th frame
			this.float=(this.float+1)%4 --inc counter
			end--if
		end--update
	thing.draw=function(this,...)
--draw with y at current offset
		spr(this.s,this.x,this.y+this.floaties[this.float])
	end--draw

	return thing

end--newthing
|
note the use of (this,...) as an argument which lets these functions refer to their "parent" table with "this." (and also why they are called using colons in the update and draw code)
The best part about setting up "objects" like this, is I can have tables full of enemies, the player, pickups, bullets, all sorts of things, and run through them and do stuff in really small, clear loops. Picking what things to keep together can be a whole other ball of wax, but this is the basic starting point for dealing with piles of things and keeping it manageable.
(edit: just like the update, there's 3 new lines in _draw() that draws all the things in the thing table.)

I got to the words, "Super Simple" and then a bee crawled in my ear and started buzzing. It's not you, it's me. What you wrote is still too advanced for me to take in.
Yet - I'm seeing that this sort of coding style is a requirement to do some of the amazing things I've seen thus far, including true 3-dimensional graphics - which also have eluded me.
Particles by themselves were difficult enough for me to understand. I know I wrote one in BlitzMAX, but it was still really tricky for me to figure out.
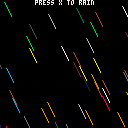
' Rainbow Rain - an experiment and tutorial in TYPE variables and LINKED LISTS
' Jan 19-2016
Strict

Const speed=10 ' change to 1 for maximum speed
Const depth=0 ' change to higher # for more raindrops per cycle

SeedRnd MilliSecs()
SetGraphicsDriver GLMax2DDriver(),0 ' zero forces front buffer
Graphics 768,576

Type particle ' My 1st attempt at using TYPE variables !
  Field x ' x-coordinates
  Field y ' y-coordinates
  Field color$ ' TYPE variables can hold more than one type AND value !
End Type ' this type has 2-integers and one string for it

Local list:TList=CreateList() ' this is called a LINKED LIST
Local dot:particle,ilist:particle ' a type of array holding more than one value
Local r,i

Repeat ' (* MAIN *)

Cls ' clear display so no streaks are left on screen
If KeyDown(32) ' hold down SPACE to add a raindrop
  For i=0 To depth
    dot=New particle ' we are DEFINING a special type of variable now
    dot.x=Rand(-576,767) ' x-position of rain
    dot.y=0 ' unnecessary it seems as by saying NEW it is already zero
    r=Rand(0,5) ' now we add an entirely different type, not integer but STRING !
    If r=0 Then dot.color$="purple"
    If r=1 Then dot.color$="red"
    If r=2 Then dot.color$="orange"
    If r=3 Then dot.color$="yellow"
    If r=4 Then dot.color$="green"
    If r=5 Then dot.color$="blue"
    ListAddFirst list,dot ' add this data to the linked list
  Next
EndIf

SetColor 255,255,255 ' white (for our rain count)
DrawText "Rain: "+list.count(),0,0 ' show how many drops are in the air
For ilist=EachIn list ' EACHIN will work with non-numeric values, and we're looping only as many raindrops as there are
  If ilist.color$="purple" Then SetColor 255,0,255
  If ilist.color$="red" Then SetColor 255,0,0
  If ilist.color$="orange" Then SetColor 255,128,0
  If ilist.color$="yellow" Then SetColor 255,255,0
  If ilist.color$="green" Then SetColor 0,255,0
  If ilist.color$="blue" Then SetColor 0,0,255
  DrawLine ilist.x,ilist.y,ilist.x+7,ilist.y+14 ' simple streak
  ilist.x:+1 ' move rain down by 2 and across by 1
  ilist.y:+2
  If ilist.y>=576 Or ilist.x>=768 Then list.remove ilist ' if out of boundaries, remove from list
Next ' and YES this does affect the total count, it's not zeroed out, it's actually REMOVED !
' powerful business linked lists are

Delay speed ' decrease this number to slow down animation effect
glflush ' show our work
Until KeyDown(27) ' (* END OF MAIN *)
|
https://www.dropbox.com/s/klzukbe7op6zk7a/My%20TYPE%20Example%20%28Rainbow%20Rain%29.zip?dl=0
How would you write this for PICO, Tyroney ?

(edit: I'll try to keep this dead on with the code you pasted)
about tables:
first attempt:
doing it more right:
First, move most of that for loop into a function for spitting out new particles:
function newdrop()
--makes and returns a new drop with random x,y and color
	local item={}
	item.x=rnd(127+64)-64
	item.y=0
	item.color=rnd(14)+1 --no black particles
	return item
end--newdrop
|
Now the code that spawns a drop - inside of _update() of course
function _update() if btn(5) then--pressed x? add(list, newdrop()) end--pressed x |
and we need to declare the list someplace, so it'll go into _init(), and I'll start pasting huge redundant blocks of code:
next I'll put in the _draw():
Here comes the movement and the culling of offscreen drops:

Ok, that should duplicate the code you pasted.
There's no delay in the my code so far. If you wanted to slow things down, one could add a timer (declare in _init(), then in update() increment it, and when timer it's big enough reset it and only then update the drops.)
edit: if I lost you at any point, say when and I can go back, add line by line comments, or whatever else might help.
edit edit:fixed x range
edit^3: if in doubt, paste code into pico to colorize comments/etc for slightly more clarity

I'm here, Tyroney. I'm reading this. Starting with the floaty things you added. It's quite a bit for me to take in !
[Q] 16-09-19 19:32
First question. Why can't I see your Tile work with this code ?
function _init() for i=0,16 do for j=0,16 do --1/5 trees mset(i,j,((rnd(5)>4 and 1)or 2)) end end stop() |
It does indeed STOP as I told it, but clicking on the MAP set shows blank. Is this correct code behavior ?
Additionally, you are going from 0 to 16, should it be 15 perhaps ?

Yup, I made the map 1 sq too big in each direction.
The map is generated at run time randomly, but not written to the cart. (when execution stops, the map is reverted to whatever it was when the cart was started) If one wanted to save it, you could save it with a cstore(), I suppose.
When I wrote this I was using the map space for ease of using the built in functions but trying to duplicate what you had started with, which was a dynamically generated background.

Hmm ... I think ZEP could change it so you can use STOP() and view what tile & map changes you have made, and of course, have a simple switch to say "Got It" and it reverts back to what you hard-coded there.
I'm still trying to figure out the floating thingies you have. That's really almost over my head.
What I've been working on recently though is the PICO Notepad. Making nice progress. I should be posting the newest working model tomorrow or Wednesday.
Having the ability to load and save 8k now is a boon, and I really thank you for sticking through with me on that tricky code.
[Please log in to post a comment]


