Cabledragon was talking to me about perlin and simplex noise generation, and we were looking at various web pages on the subject. One of them was a novel implementation of a simplex noise generator, written by Kurt Spencer, a game dev who did not wish to be subject to Perlin's patent on his own version of simplex noise:
http://uniblock.tumblr.com/post/97868843242/noise
With a public-domain javascript implementation of 2D, 3D, and 4D noise here:
https://gist.github.com/kdotjpg/b1270127455a94ac5d19
The 3D and especially the 4D code is rather long and spaghettilike, though I suspect for good reason, but I noticed the 2D code was not too bad, really, so I took a pair of Lua shears to it and made it fit on our little platform.
It performs pretty well. It looks good, and while you can't efficiently use it to set every pixel on your screen, it's quite adequate for caching your terrain at app launch, or even for real-time generation of the area immediately around you, if you can be somewhat economical with how many times you sample the noise.
Note that, as mentioned in the code, the shell I wrote around this adaptation isn't particularly useful. It's just a custom-made and optimized-to-the-point-of-being-ugly viewer for the noise generator.
The generator code is on the second tab, and that's what you'll want to look at if you want to use it yourself.
Usage of the generator code is simple:
os2d_noise(seed)
- Initializes the noise generator with the given seed. Different seeds produce different noise patterns.
os2d_eval(x,y)
- Evaluate the noise pattern at x,y, returning a fraction between -1 and +1.
Edit: It's probably worth noting that the noise repeats, cleanly, at the length of the seed array generated by os2d_noise(). For larger fields, you'd want to increase the size of the array and accommodate that by adjusting the index masking that's done when referencing the array. I might actually make this configurable at some point.
Edit: Note that this demo is set up to show off the results as slickly as possible, not as a sample. If you want to see a sample usage case, where I also add multiple layers of noise for a more crinkly look, see a later comment below.
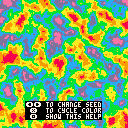
Here's the demo. Use ⬅️/➡️ to change the seed, ⬆️/⬇️ to change zoom, ❎ to cycle colors, 🅾️ for help. Note that it's slowly caching the zoomed images in the background, so zooming in quickly might produce some tearing at first.
V1.1: Turned off color cycling due to a complaint and put a toggle on X.
V1.2: Caching indicator, because communicating with the 0 users who run this is important!

Just a note to any epileptics whom I've accidentally dropped to the floor: I turned off color cycling by default.

Thanks! Hoping to find a game to use this in for terrain generation

Thanks for this Felice,
I too am keen to use this for terrain generation, but I'm kinda stuck on how to make it look "realistic".
Currently, this demo creates a very "smooth/fluid" output?
I'm guessing it needs multiple "passes/layers" of noise to get more details?
(as very neatly described and demonstrated in THIS helpful article)
Either way, any pointers to helping turn this great demo into a more "realistic" output levels (e.g. water, beach, grass, mountains, etc.) would be much appreciated.
Thanks!

Yeah, that link is basically your answer.
Simplex noise has a pseudo-frequency, you might say, and just like a regular wave, like a sine wave, the more you scale it up, the smoother the waves/bumps get.
If you want detail, you add a lesser amount of simplex noise sampled at a lesser scale. And you can do this recursively.
If you're familiar with detail textures in 3D games, it's a similar principle. You have, say, a normal map at a coarse resolution that's tolerable for the usual viewing distance, but when you come in close, you overlay some appropriate noise or handcrafted detail map, and you can keep on doing that the closer you get, to simulate infinitesimal detail.

Also, you could use different samplings of the noise not just for, say, combined height maps, but also for the density (or even type) of things like rocks, grass, flowers, snow, etc.

Ok, cool - good to know I'm on the right track, thanks! :D
I just need to figure out how to adjust your test cart to apply detail layers at different scales.
It sounds like it should be simple, but I think I just need for the theory to sink in more!
#PerhapsIShouldSleepMore

Hmm, looking at my demo, I'd say it's not very friendly to modification. I was going for maximum speed on caching the multiple zoomed images to show off the results, so it's kinda hard to read that part of the code.
Here's a cut-down version that just computes one zoom level, with no cachery-trickery and just does sset(x,y,c) to fill sprite ram, and with lower levels of noise added. It's not a great demo, but it's much easier to see what's happening on the code side:
Specifically, look at update_image().
You can mod this by changing the scales on x,y, offsetting x,y, and adjusting the contribution of each level.
You might want to scale down the result a little, as the cumulative additions can exceed -1..+1. You can see this in the larger clamped red and pink areas at opposite ends of the spectrum in the initial image.
v2.0: built on a new os2d_noisefn() that can vary tile width and uses current PICO-8 syntax for perf (2024-01-10)

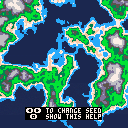
I messed with it a bit to simulate a basic landscape:
v1.1: better scale and palette
v2.0: built on a new os2d_noisefn() that can vary tile width and uses current PICO-8 syntax for perf (2024-01-10)

Oh wow, thanks again Felice - this is perfect! :D
Having the code so well-documented is a blessing for ppl learning the subject (like me!)
These lines in particular really helped me to bridge how we got here from your initial demo:
-- base noise is strongest c =os2d_eval(x/32,y/32) -- next is weaker c+=os2d_eval(x/16,y/16)/2 -- and so on c+=os2d_eval(x/ 8,y/ 8)/4 -- and so on c+=os2d_eval(x/ 4,y/ 4)/8 -- and so on c+=os2d_eval(x/ 2,y/ 2)/16 |
Commenting them out and back in again, you can really "see" how the detail is fine-tuning the landscape.
It's feels like watching an old-school renderer or fractal generator, adding detail with each "pass".
Thanks again for taking the time to put this together, much appreciated.

Glad to help, and sorry to saddle you with an unhelpful demo in the first place. I'd thought just to showcase the results and leave the usage to the documenting text above the demo, but I often forget that we all like to start with sample code and then tweak & adapt it, so that was my bad. :)
By the way, that effectively IS the method you use for fractal terrain generation: large RNG values at large intervals, offset by smaller RNG values at smaller intervals, offset again by even smaller RNG values at even smaller intervals, and so on, and so on, to infinitely-small detail at infinitely-small scale.

It occurred to me that I should mention something potentially useful...
In the landscape demo above, I've set a sea level and then palettized all the levels above it to look vaguely like beach, grassland/forest, and mountains:
geog_pal14={[0]=
	-- water
	1,
	12,
	12,
	-- beach
	7,
	15,
	-- grassland/forest
	3,
	11,
	11,
	3,
	-- mountain
	5,
	13,
	6,
	6,
	7,
}
|
Now, if you were to render it in 3D, this would actually result in seeing continuous upward slopes with bands colored various shades of blue, tan, green, gray, and white, which isn't necessarily what you want. Water, beach and grassland/forest areas are normally flat or at least close to flat, while mountains are steep slopes.
So, maybe a palettized elevation might be appropriate as well. You could project the randomized height samples onto a segmented set of lines or curves. Here's a simplistic elevation palette that just mimics the color palette:
geog_elevation14={[0]=
	-- water
	0,
	0,
	0,
	-- beach
	1,
	5,
	-- grassland/forest
	10,
	15,
	15,
	20,
	-- mountain
	40,
	80,
	150,
	300,
	500,
}
|
Those are just numbers I'm making up, but you get the idea. Just trying to give you something to think about.
There's a wealth of other stuff to do to landscape generation, e.g. features, erosion, etc. It's a fun topic, one I wish I had more time & energy to get into. It'd be fun to play around with NMS-style biome generation.

Thanks again for this Felice.
Yeah, I already understood the colour palette that you had, because... it was actually VERY similar to the colours I picked when I first tried modifying your original code (but your beach colour choices are much better!)
I guess the secrets out now as to why I wanted this code, and it is for the NMS "demake" that I'm gonna attempt
("attempt" being the operative word here).
I'm gonna stick to 2D though (as I think I'm already challenging myself enough at this point). I plan to do something similar to the approach that @2darray did with his "Tiny Fisher" game.
(I bought it and his commented code explains a great way to do custom map rendering that I'm hoping to adapt, using OpenSimplex data as the source).
Either way, I think it should be fun! (and thanks again) :D

Ack, sorry, I didn't mean to necropost this. I only edited the OP to include the original OpenSimplex author's name, but apparently editing the OP bumps the whole thread.
There's nothing new to see here, move along, move along. :)
[Please log in to post a comment]


