Plan :
- Inception
- Gameplay
- How to render 3D meshes in Pico 8
- Pre-rendered magic
- Extracting meshes from Alone in the Dark
- Character animation
- Memory layout, packing and ram management
- Camera placement, tools
- Interactions, objects animations, sounds
- Optimization
- Triangle strips
- Future
Disclaimer : my english skills are a bit low and I wrote that post a litlle too fast ...
The final project can be found here
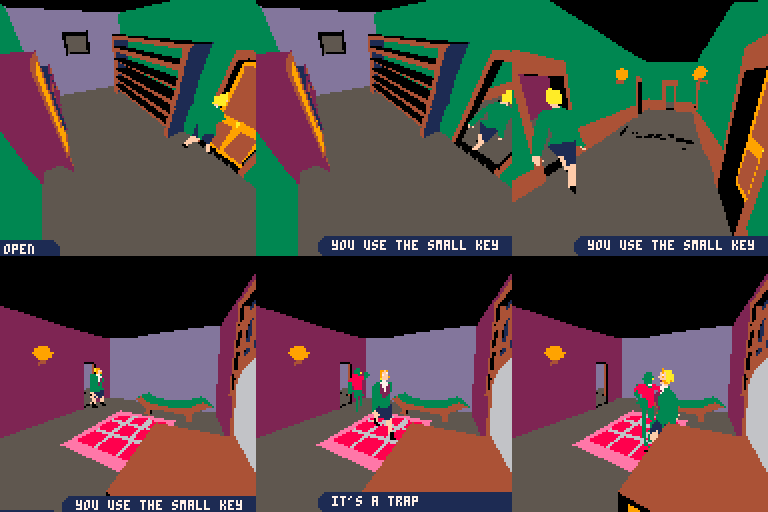
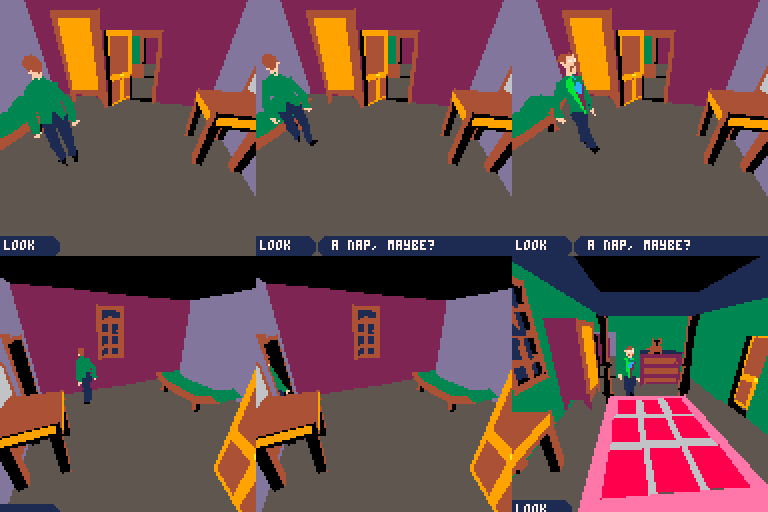
1. Inception
The idea of making a Pico 8 demake of the classic cult game Alone In The Dark started at Halloween 2015. I was searching for a mockup to do using Pico 8 color palette, and Alone in the Dark seemed a pretty good fit. After looking at it, the original is a lot more detailed than what would be possible in Pico 8. Getting from like VGA 256 colors to 128x128 16 colors would not be easy. But the mesh complexity in Alone in the Dark seemed doable in Pico 8. I had just finished a small 3D demo in Pico 8 so I knew that I could probably draw the character at 30 fps and pre-render the background.
The mockup that started everything :
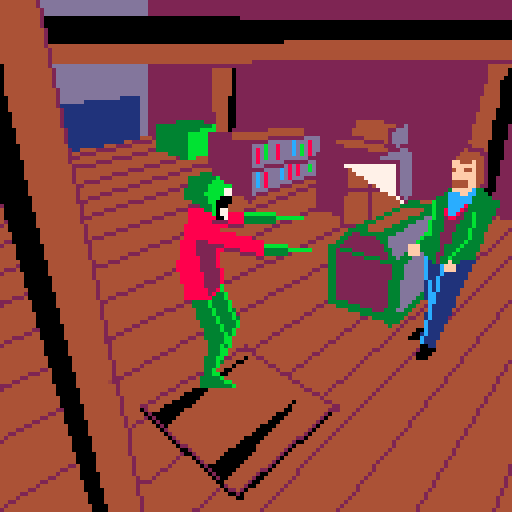
The mockup was well received, but after that I was quite afraid by the quantity of work to do to make it real, so I let the project sleep. Until 3 month later, I get a twitter reply by Frederick Raynal himself, director of the original Alone in the dark. It turns out that he is quite interested in Pico 8.
This was enough to give me motivation to push the project forward.
You can play in you browser to the original Alone in the Dark here
2. Gameplay
Alone in the Dark is a good fit for Pico 8 as the original can be played with only 2 buttons beside direction keys. One button is to open an inventory, where you can choose a “stance” for your character (like “search”, “push”, “fight” …) or see your items. The second button apply your stance around you, so your character will search, or push something around or start fighting (using direction keys to choose fight animations).
For each item in the inventory, you can do a large quantity of actions, like read a letter, throw an object, put it on the floor, open boxes, drink potions … This is an heritage of the text-based adventure game I think. Nowadays everything is contextual, but back then you would have to know which precise action to do with every item and background object.
I first wanted to do all of that. But it was tricky on several level. First, the fighting needed a lot of animations, which is not easy to do. I also wanted an exploration game more than an action game. By replaying the original, I saw that you could bypass nearly every combat in the first two floors. So I decided to leave the fight out, and make the player find “peaceful” ways to progress.
The complex inventory system of Alone in the Dark was a bit much for Pico 8. With the 128x128 16 colors, there was not enough details to give you hints about what action you could do where. So I did a more “modern” system, where there is a visible prompt when you can do an action somewhere, and the action is contextual. It makes the game really simple, but it fit the format of a short exploration trip much better. With more tokens/time, I would have added some keys icons to show progress. And maybe some Lovecraft books to read ...
3. How to render 3D meshes in Pico 8
I started by using the tools from my previous 3D demo in Pico 8, Space Limit
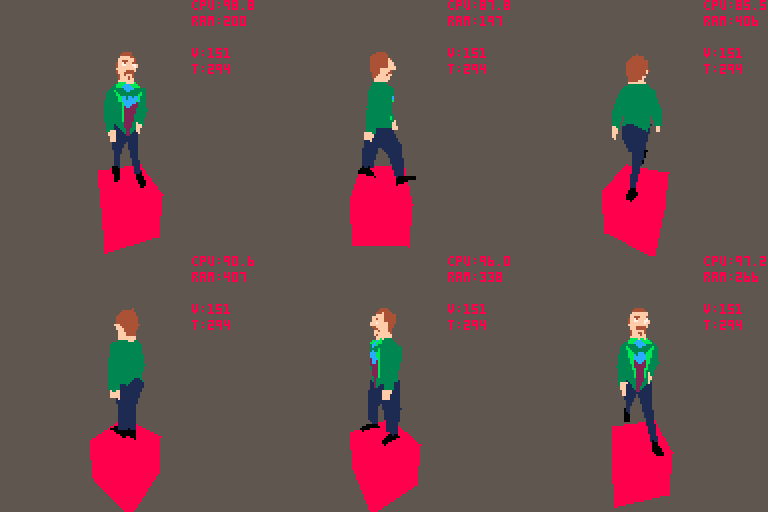
I was originaly going to remake everything, from characters to background images. So I made in Blender a crappy looking character that vaguely resembled Edward Carnby. My custom-made exporter enable to have a color per triangle.
Here is the Blender plugin i made : plugin blender
My first hand-crafted Edward model :
I also latter modified a mesh stripping sample from coder corner to load, strip and convert meshes to character strings. More on that in the “Triangle strips” section.
My tools produce two strings : a vertex buffer and an index buffer. Each string can be copy/pasted in Pico 8 and some code will decode it and store it in arrays.
The vertex buffer encode the position (x,y,z) of each vertex of the mesh, and the index buffer describe the triangles of the mesh. It stores the index of the 3 vertices making the triangle, as well as the color of the triangle. To make it easy to use, each value is between 0 and 255 and is stored in hexadecimal, so two characters. The color is the only value that can be stored as 1 character, as there is only 16 values, thanks to Pico 8 limitations. The vertex buffer is also linked to a scaling value, to transform from 0-255 to the desired mesh size. The mesh can only have up to 256 vertices, as we store their index as 2 hexadecimal strings, but it’s usually enough.
The objects I made in Blender :
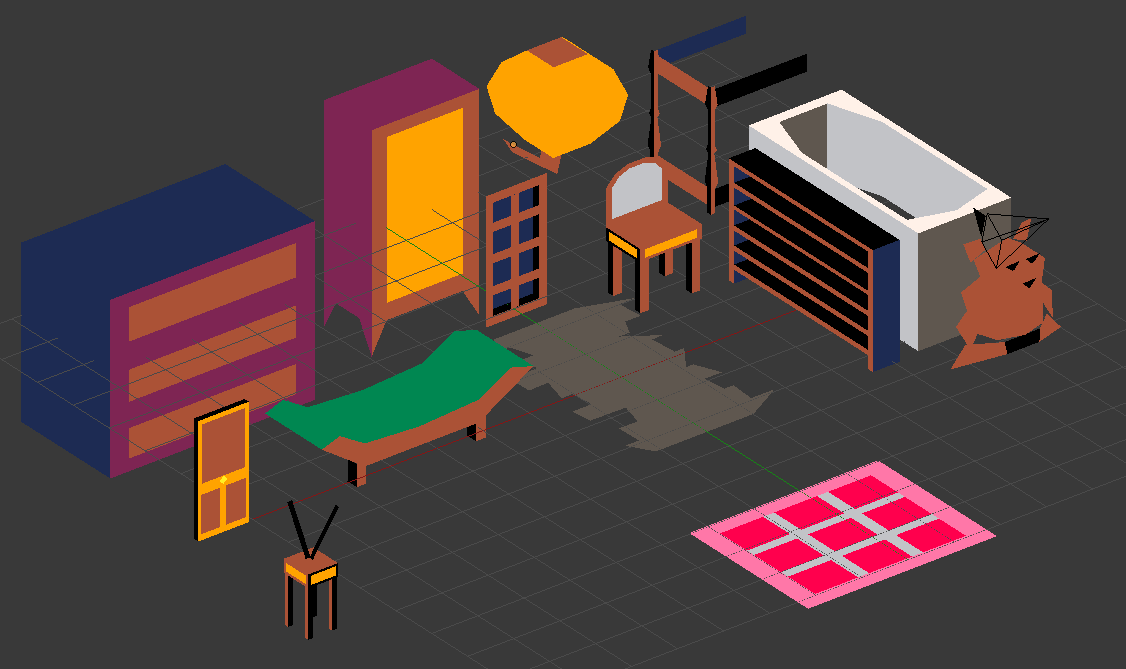
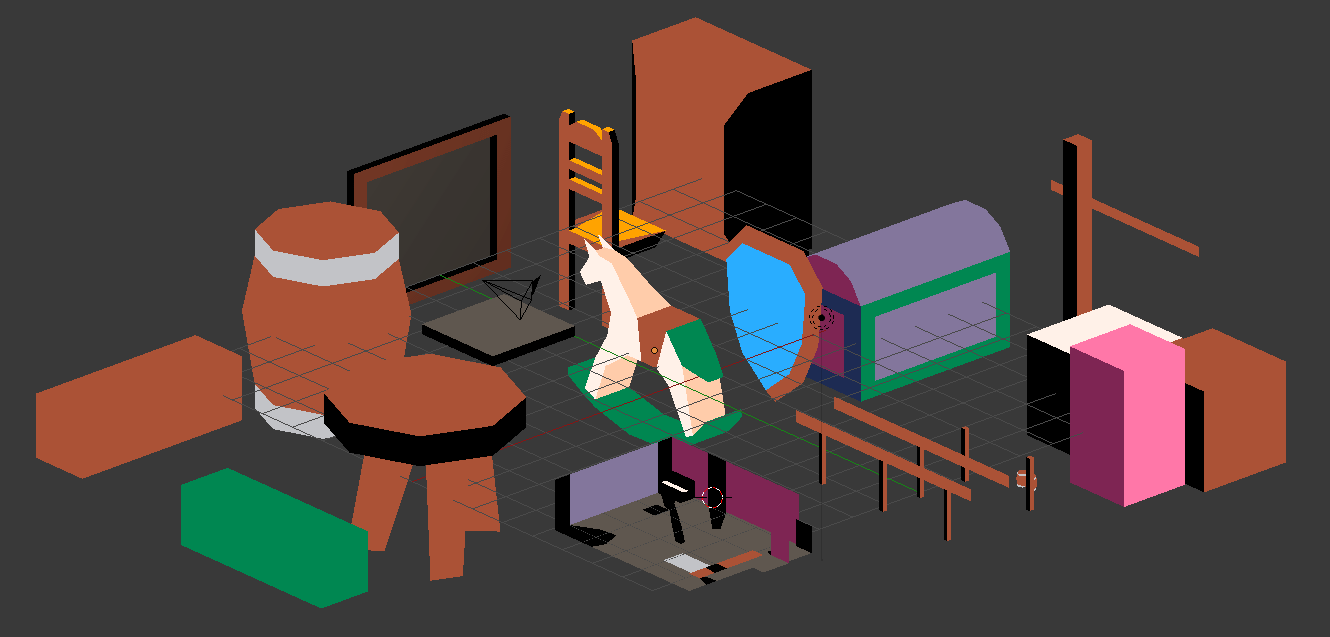
Here is a sample code to decode the “val” vertex buffer string into the “verts” array:
function avlist(verts,scale,val)

	local maxsize = 5.0*scale

	while(#val > 0) do
		local cur = sub(val,1,6)
		val = sub(val,7,#val)

		local x = flr("0x"..sub(cur,1,2))
		local y = flr("0x"..sub(cur,3,4))
		local z = flr("0x"..sub(cur,5,6))

		x = (x/256.0 - 0.5) * maxsize
		y = (y/256.0 - 0.5) * maxsize
		z = (z/256.0 - 0.5) * maxsize
		verts[#verts+1] = newver(x,y,z)
	end
End
|
Then when we want to draw the mesh, here are the steps :
First transform each vertex in the viewport space :
	local tverts = {}
	local tv = #verts
	for i=1,tv do
		local cur = clone(verts[i])

		local side = 1
		if(cur.z<0) side = -1

		cur = v_add(cur,v_sub(ent.loc,campos))
		local cur2 = clone(cur)
		cur2.x = dot(cur,camright)
		cur2.y = dot(cur,camup)
		cur2.z = dot(cur,camdir)

		local invz = 64.0*(1.0/max((cur2.z),0.1))
		cur2.x = (-cur2.x * invz + 63.5)
		cur2.y = (-cur2.y * invz + 63.5)

		tverts[i] = cur2
	end
|
The vector camright, camup and camdir are the 3 vectors of the camera space. In the final project, those vector and the campos are pre-transformed with the rotation of the mesh, making possible to turn the main character with a really small cost.
The next step is to sort the triangles. In a modern renderer, we would use a z-buffer but then you need to store it with good precision, and it can hurt your framerate. Each pixel need to be compared to the z and you can’t use a simple rectfill to draw several pixel together.
Sorting can be fast, but come with some issues.
To sort our triangles, we need to compute it’s distance to the camera (or simply the average of the 3 vertices z location). Then we can either sort them completely, which is slow, or iteratively, spreading the work over several frames. We will do a complete sort only when changing camera, and iteratively each frame so the dynamic objects keep beeing about sorted. If you rotate the character too fast, you will see triangles being wrongly sorted. We sort by swapping values in the triangle array, which is persistent between frames. We can even adjust how many passes of sorting we do per frame depending of the framerate.
local tn = #tris for i=1,tn do local ct = tris[i] ct.avg = tverts[ct.v1].z + tverts[ct.v2].z + tverts[ct.v3].z end if tele_cam then sortalltris(tris) else sorttrisloop(tris,2) end |
And finally we will render the triangles on the screen. To make a real 3D renderer, you should here compute the intersection of the triangle with the near clip plane. Depending of the intersection, you would draw up to 2 triangles. To save some framerate, I don’t do that, but it would be required for a generic 3D renderer. It’s only an issue when triangles goes out of the screen and behind the camera. We will have to place our camera carefully to avoid those glitchs.
for i=1,tn do local ct = tris[i] local v1 = tverts[ct.v1] local v2 = tverts[ct.v2] local v3 = tverts[ct.v3] -- We check if the triangle is facing the camera or not local back = (v2.y-v1.y)*(v3.x-v1.x) - (v2.x-v1.x)*(v3.y-v1.y) local minx = min(min(v1.x,v2.x),v3.x) local maxx = max(max(v1.x,v2.x),v3.x) local miny = min(min(v1.y,v2.y),v3.y) local maxy = max(max(v1.y,v2.y),v3.y) local minz = min(min(v1.z,v2.z),v3.z) -- Compute the bounds of the triangle, cull it if outside the screen local clip = maxx < 0 or minx > 128 or maxy < 0 or miny > 128 or minz < 0.01 if back>=0 and not clip then otri(flr(v1.x),flr(v1.y),flr(v2.x),flr(v2.y),flr(v3.x),flr(v3.y),ct.c) end end |
The only part left is the rendering of the triangle itself. Here we separate the triangle in two, with an horizontal slice. Each line will then be rendered using rectfill.
function otri(x1,y1,x2,y2,x3,y3,c) if y2<y1 then if y3<y2 then y1,y3=swap(y1,y3) x1,x3=swap(x1,x3) else y1,y2=swap(y1,y2) x1,x2=swap(x1,x2) end else if y3<y1 then y1,y3=swap(y1,y3) x1,x3=swap(x1,x3) end end y1 += 0.001 local miny = min(y2,y3) local maxy = max(y2,y3) local fx = x2 if y2<y3 then fx = x3 end local cl_y1 = clampy(y1) local cl_miny = clampy(miny) local cl_maxy = clampy(maxy) local steps = (x3-x1)/(y3-y1) local stepe = (x2-x1)/(y2-y1) local sx = steps*(cl_y1-y1)+x1 local ex = stepe*(cl_y1-y1)+x1 for y=cl_y1,cl_miny do rectfill(sx,y,ex,y,c) sx += steps ex += stepe end sx = steps*(miny-y1)+x1 ex = stepe*(miny-y1)+x1 local df = 1/(maxy-miny) local step2s = (fx-sx) * df local step2e = (fx-ex) * df local sx2 = sx + step2s*(cl_miny-miny) local ex2 = ex + step2e*(cl_miny-miny) for y=cl_miny,cl_maxy do rectfill(sx2,y,ex2,y,c) sx2 += step2s ex2 += step2e end end |
4. Pre-rendered magic
The main technical trick that Alone in the Dark use is : pre-rendered backgrounds. This made possible having complex environments while using real-time characters. It gave a “cinematic” feel to the game.
In the case of my Pico 8 demake, it’s a bit different. I could not realy store backgrounds in a large quantity inside the limited space of a Pico 8 cartridge. With some compression, it may be possible but only up to a certain point.
Instead of storing backgrounds, I can render them from 3D objects, but only when the camera change. I can store a large quantity of 3D meshes, and reuse them at will. I can also put a lot of camera angles, without using more memory.
Rendering the background only when the camera change leave all the cpu free to draw the dynamic objects (the main character for example). The only issue is that we need to store the background between frame, so we can start each frame with just the background, and draw dynamics on top of it.
Here is a sample code to do that. The function fillsorted() will add meshes in the background and dynamics arrays. The memcpy store and put back the background when needed (in two separate chunks to make it fit nicely where there is space left in memory). The variable need_paste is set to false when there is a camera change.
function _draw()
	if need_paste then
		memcpy(0x6000,0x3E00,0x0400)
		memcpy(0x6400,0x4300,0x1c00)
	else
		cls()

		fillsorted()
		foreach(background, draw_tris)
		bground = {}

		memcpy(0x3E00,0x6000,0x0400)
		memcpy(0x4300,0x6400,0x1c00)
		need_paste = true
	End

	foreach(dynamics, draw_tris)
end
|
We don’t want to sort every triangles of every object between them, as it would be slow and not realy frame consistent when objects pass each other. So we sort first each object according to their location before drawing their sorted triangles. In the end I sorted objects using the 2D coordinates on the floor, as it was better than using 3D coordinates of the location.
The background mesh of each room was too big and it didn’t make sense to try to sort it with the static objects in the scene. So there is a list of background room meshes that is draw before everything, and a list of background object meshes drawn on top of it. And then the list of dynamic objects.
The most important issue with prerendering background is that objects from the background cannot pass in front of the main character. So for example the pillars in the cellar would always be behind, which break the immersion of the scene.
My solution was simply to manually select the most problematic objects for each view angle, and draw it dynamically so it’s sorted with the player. There is some tricks to it that I will describe in the “Optimization” section.
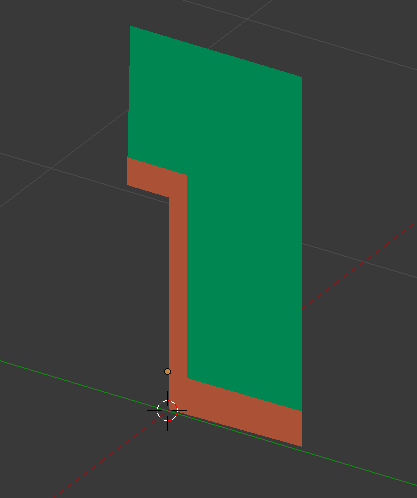
When the player is entering/exiting using a door in the second floor, I need a bit of masking so it seem like he pass inside the door. But the background is pre-rendered. So I made some half door covering, that I put in front of each door.
A half-doorway used to cover the character :
5. Extracting meshes from Alone in the Dark
The three characters I ripped from alone in the Dark :
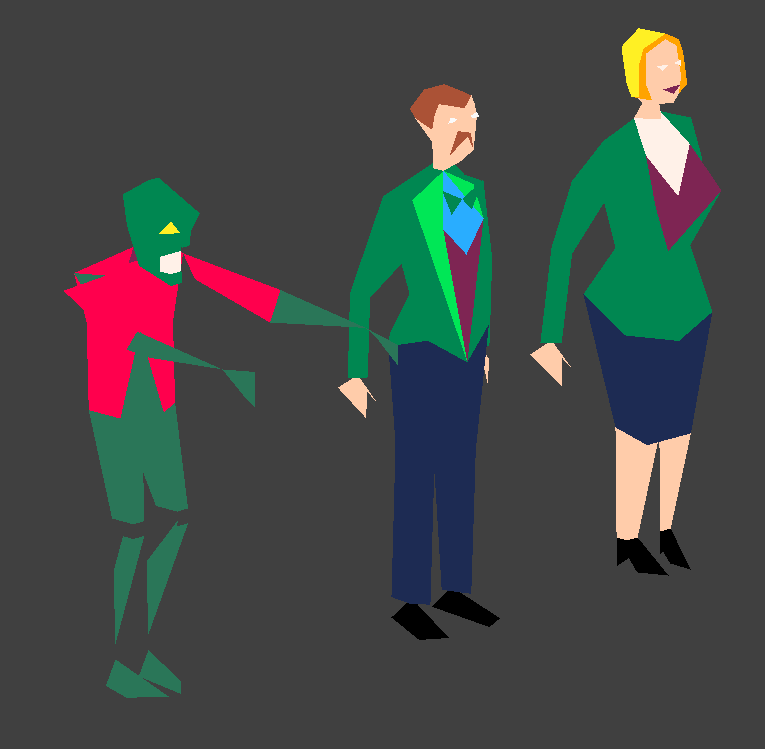
After I tweeted a gif of my first mesh, Frederick Raynal gave me a good idea : using the meshes directly from the original game. I first searched if someone already had ripped the characters and made them available, but no luck. Frederick saved the day again and found an animation/mesh viewer a fan made for Alone in the Dark. As I got the source code of the viewer, I could try to add an export option. But it was a lot of work, so instead I used an openGL interceptor that can save textures and 3D models from “any” openGL game. That way I could directly get a .obj of all dynamic meshes from Alone in the Dark. Obviously the background where not in 3D, so I still needed to make that myself in Blender.
So I ripped Edward, Emily and a zombie mesh. After that I only needed to choose a color for each triangle, trying to mimic the original. The color must comme from the Pico 8 palette of 16 colors of course.
Here is the openGL interceptor I used :
GLIntercept
There was also an amateur open source project called “Free in the Dark” but it’s difficult to find now. Plus with that project the openGL injector kept giving me view-space meshes, which is not very practical.
6. Character animation
I decided quite early that I will not have fighting, so that leaved mainly the character walking animation. I did it procedurally, using only simple maths. I use y and z location of vertices to decide which part of the body it belong. Then using sinuses and offsets between body parts, I tried to give it a walking animation. There is also some interpolation, so the character take some frame to get back to the idle pause. I reset the animation time when the character doesn’t move, so he/she always start at the beginning of the walking loop. The code is a mess, but you can find it in the draw_tris_anim() function.
Both Edward and Emily are animated the same way, with just some slight adjustments to the limits between each body parts.
7. Memory layout, packing and ram management
Making everything fit in the limited space of a Pico 8 cartridge was a bit of a challenge. The layout of data was not completely static, as different data where needed at different times. I needed space to store vertex/index buffers. I needed space to store the backbuffer between frames. I needed space to store collisions.
First, there was the two character mesh data, which was required only in the selection screen. Then we would keep the selected character data in RAM, throw away the other, and would not need the cartridge memory anymore.
To reduce the collision footprint, I compressed it as 1-bit per cell. So each cell would only be traversable or not. After the selection screen, the collision data are put back in the “map” memory location, where the two characters data where stored. Having collision in the map memory make it easy to check and easy to change in gameplay (when moving objects, opening doors …)
The backbuffer between two frames is stored for the most part in the “user data” section of the memory, which is not stored in the cartridge anyway. The small part that doesn’t fit in the “user data” is put at the end of the “sfx” section, leaving about 32 sounds free for music/sfx.
Another issue was the RAM size. I started the project with the 0.1.5 version of Pico 8, which had only 512k of ram. With 0.1.6 it’s now 1024k of ram and it’s a lot easier. I still need to clean all meshes data between each room to save ram. The top floor fit totally in memory, but the second floor does not. Between each room, I clear all meshes (by setting their references to nil) and construct only the required ones from the cartridge data. The same bit of code also decide in what draw list each mesh go (prerendered background, prerendered sorted background, dynamics).
Some meshes are not stored in cartridge data but directly in strings inside the code. I did that because I was nearly out of cartridge space. But it’s quite risky as this will count in the “compressed size” limit, which is one of the main limitation.
8. Camera placement, tools
To make working on the game a bit easier, I made a debug mode where you could change the camera position, the location of it’s target, and the distance between them. The camera position and target position were printed on screen, so I could take notes when placing cameras. This mode rendered everything in real time, at like 3fps, but made debugging simpler.
To pack my datas in the cartridge, I used others cartridges as tools. Instead of having to figure out how memory is packed in the .p8 file, I just put the strings I want to insert in a fresh cartridge. A small code read the string and put each value in the memory at a specified address. The code then make a cstore() to save the memory in the .p8. I can then copy the cartridge data from that temporary cart to my final cart using a text editor.
local vadd = cur_addr for i=1,#verbuf,2 do local value = "0x"..sub(verbuf, i,i+1) poke(vadd,value) vadd += 1 end |
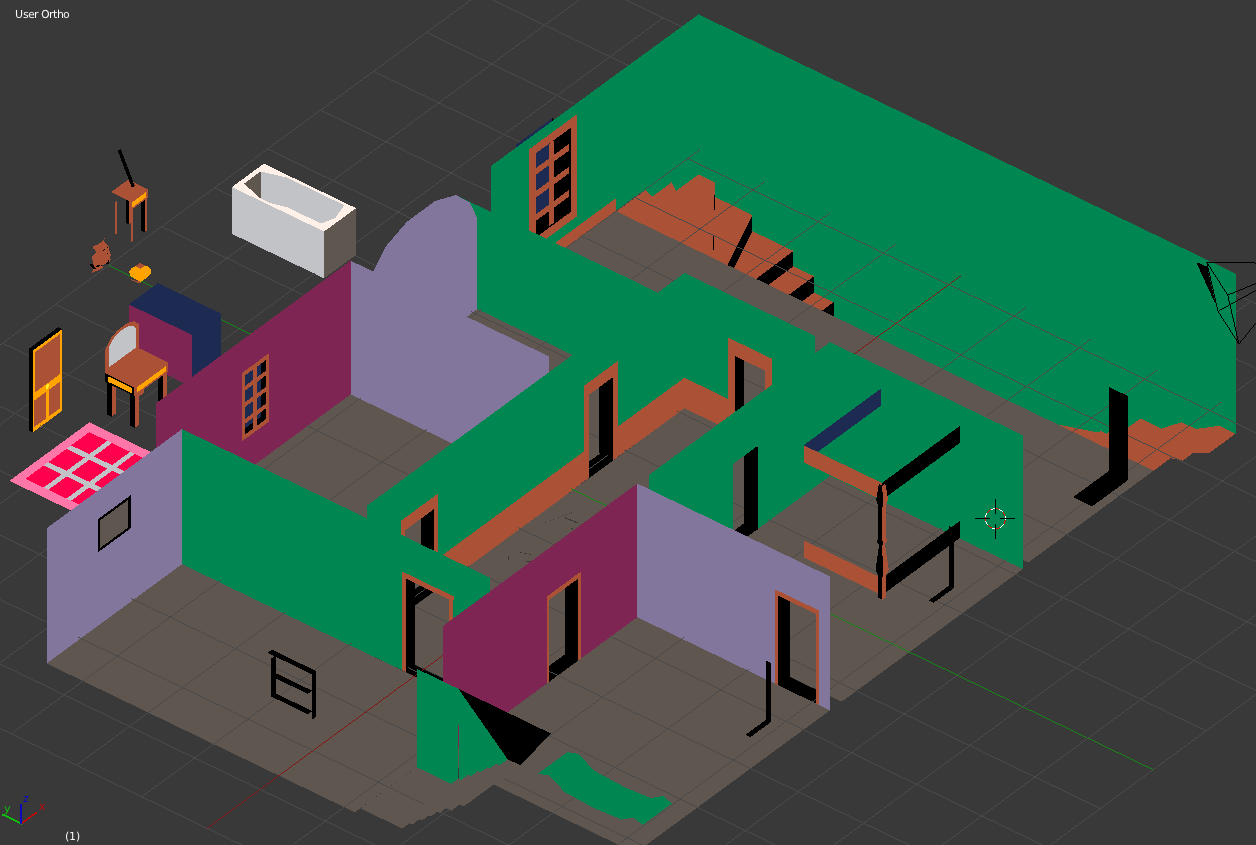
View of the second floor in blender without dynamics objects :
9. Interactions, objects animations, sounds
To make the interaction system, I wanted to merge everything in a single system to keep token count low. I also wanted to experiment with LUA flexibility.
So here is how I declare a simple text interaction at the location x=10,y=20 over a circle range of radius 4 in the floor #1 :
newact(10,20,4,1,"a simple chair") |
But I can extend the functionality if needed, here for an interaction that give you a key, specifying what text to print when you pickup the key :
ac_pianokey=give(newact(-52,-10,4,2,"nothing left"),"you find the piano key") |
Here is some extreme case, where a door will only open if you have the piano key, and then remove some collisions and animate the door over a fixed period of time to open it. It will also say “open” in the prompt instead of “look” and play the sfx #14 :
ac_door3=newact(-35,2,7,2,"you use the small key", function() setcol(0,112,16,3,2) end, function() r2_door3.rot -= 0.0166 end,nil,"open",14) ac_door3.need=ac_pianokey |
To keep the door open if you come back later, I have some code in the scene construction code (“.anim” let me know if the action has been made) :
if(not ac_door3.anim) setcol(1,112,15,3,4) r2_door3.rot = ac_door3.anim and -0.7 or -0.25 |
Some interaction start automatically when the player enter the range. Here is a zombie trap that will launch itself, change the music to #9 and make the sound #15
ac_zomb3=auto(newact(-23,-29,11,2,"it's a trap", function() setmusic(9) end,nil,nil,nil,15)) |
I also made an interaction type that just change the footstep sound when in range. Now that I think of it, I should just have specified a footstep sound per camera, it would have been much easier.
You can find the interaction code in the function doaction(action), but I would advise you to write your own because this one is messy and tweaked for my need.
10. Optimization
Here I will just show some funny tricks I used to maintain a nearly constant 30fps.
In the first camera of the game, you see a green table covering the whole bottom of the screen. The view was really heavy and it was sad that the first screen the player see was not at 30fps. So I simply removed the table, and I manually draw a gigantic green circle on the bottom, to simulate the table on this camera angle only.
I did most of my test using the mesh of Edward Carnby, as it’s the first I made/ripped. But when I ripped the mesh of Emily Hartwood, it had a lot more triangles. To try to keep it about the same, I sadly removed some triangles from Emily’s mesh. The most obvious is the hair area, which were a lot rounder than for Edward. I also simplified her high heels, but I don’t think it’s visible. Even after that, she is heavier than Edward, and you can lose some frame sometimes.
For some scenes I draw some objects only when I think the player is near them. So the object are drawn in the pre-rendered background, and can be also rendered dynamicaly on top if the player is near. For example some pillars in the cellar are drawn like that.
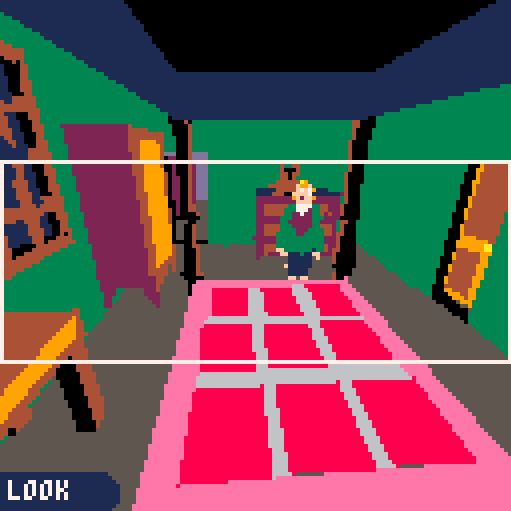
In the bedroom, downstair, it was quite hard to reach the 30fps. So there is a custom clip rectangle for dynamic objects, to limit what I need to draw to the area the player can go.
The clipping rectangle in the bedroom :
To keep some ram, objects in the second floor are not duplicated, but simply shared between rooms and moved. In the last room, with the double-wings stair, I even use the same altar, mirror and zombie for the two sides.
The tokens and compressed size limits were frequently reached. The compressed size is a bit less hard, because in recent versions of Pico 8, it only shows itself when you export in html or upload on the BBS. The tokens size is a hard limit, if you are above you can’t run the game. Regularly I would optimize and get back some tokens, mainly by removing old code, useless parenthesis or “inlining” function that were used only once.
Near the end, I even needed to remove the debug tools (and not even leave it commented as that still count in the compressed limit) for camera, cheats … I added some specialised functions to insert in a specific array instead of specifying the array each time to save tokens/compressed. Ternary operator are also useful (IF x THEN v=a ELSE v=b END become v= x AND a OR b)
11. Triangle strips
While I was making the game, I always thought that I would not be able to put the two characters inside the same cartridge. They are in fact the largest meshes and I hadn’t enough space to keep them and store objects for the two floors. Without even thinking about storing the zombie. So I was going to release two cartridge, one with Emily and one with Edward. But the options on the BBS does not really allow that in good conditions. I could choose one to put in front of the thread, and the other would be just below. But only the first would appear in XPlore and be playable easily. Or I could make two separate threads, but it would divide the attention, or even make it in a competition between the two characters.
So while asking to Zep for advices, he kinda suggested that it should be possible, as a CHALLENGE to pack everything together. So I needed to do it …
Then I had the nice idea of using triangle strips buffers, instead of the classic “triangle after triangle” index buffer. With triangle strips, you set a list of triangles where each new triangle reuse two vertices of the last. It makes the index buffer much shorter.
I looked online to find a library and the one on Coder Corner seemed nice and comprehensible : Strips
So I changed it to load the files that are exported by my Blender plugin. I added some code so every packing is done in one place (before that I used a crappy javascript tool I made). I could even pack all my files in one go, and print strings ready to paste in Pico 8.
As my colors are per triangle instead of per vertices, I needed to do the stripping separately for each colors. Each strip would store : the length of the strip (8 bits), the color of the strip (8 bits because using 4 bits would add a lot of trouble when decoding with peek) and then each vertices index (8 bits).
Here is my modified version (to use with visual 6) : PicoStrips.zip
This worked very well, each index buffer became about half as long, putting it at about the same size as the vertex buffer. With that optimization, I could repack everything with enough space to store the two characters, the zombie, and even enough sfx space to store songs and proper sound effects. All of that in one single cartridge.
For now, the triangles are not stored in ram using strips as I would need to rework a lot of things. Plus as I use the triangle list to sort everything, a strip version would not be faster.
12. Future
I am really glad I finished that project. It took about 6 months, and some hurdles were hard to overcome, but the result is nice. I want to thanks Frederick Raynal for the amazing game that is Alone in the Dark, and for his help in making this small project.
For now this project if finished, adding more of the original game would require several cartridge, and implementing more complex interactions (fight, throwing, shooting …)
But if some people are interested, I may make a simple 3D application as a sample.
I would polish my tools so others can use them, and make a simple tutorial.
Beside, I want to continue experimenting with Pico 8 and 3D, maybe with procedurally created worlds ...
If you have any questions or advices, feel free to post here.

My God you spent 6 months working on this?!
You must have really enjoyed the challenge.
Thanks for the postmortem, it was very informative.

Great to see all this stuff! Really interesting hearing about the various challenges, I'm still surprised you managed it! Well done and I look forward to seeing what you do next...

Thanks for the detailed write up! It's always great to see the development process behind a small miracle like this.

NuSan:
An optimization that might interest you:
y1,y3=swap(y1,y3) |
Can be reduced to:
y1,y3=y3,y1 |
Also, if you were adding an epsilon (minimum increment) with this:
y1 += 0.001 |
The smallest possible epsilon is easily expressed in hex notation:
y1 += 0x.0001 |
But that's not very important. :)
Anyway, thank you for the details, it was an interesting read. :)
I like the incremental sorting idea, though I wonder if it would be best to use an algorithm that's nearly free when the list is sorted anyway, but will be correct when there's much to be done. The other thing you can do is to use a bucket-sorted structure--a list of triangles in buckets that correspond to Z/W ranges. Many PSX games used this, as the PSX had no Z-buffer. I also used it in an N64 driving game where we chose not to use the Z-buffer. It's a little tricky but very fast.
(Sometimes I want to write a PICO-8 driving game, but I just don't have the mental focus anymore to write entire proper games, or else I'd still be working, sigh.)

This absolutely blows my mind. Amazing work. You're an inspiration. Thank you so much for the demake, and the write-up. :)

Thanks for the postmortem, it's always good to see behind the scenes of large projects like this. You've done incredible things these six months.

Loved reading this.
I feel like a douche reporting bugs, but: the interaction with the statues at the end are still there even after they disappear.
Astonishing work. Bravo!

@Felice I tried your swapp method at some point, but as it wasnt faster I didn't keept it, and then never came back there when optimizing tokens. But it's a pretty good idea. The bucket sorted could be nice, not precise but probably enough for my needs.
@matt Thanks for the bug report, I can't believe I never noticed that. I uploaded a fixed version just now, hopefully without breaking anything else !

Thanks a lot for taking the time to write this up, it's really interesting to see the problems you faced and how you went about solving them. Both the game and the postmortem are really great and inspirational :)

Awesome work and a fantastic read. As a longtime "wannabe" programmer and new convert to Pico8 it was great to read such a detailed deconstruction of how you pulled this together, and very educational. Thanks muchly!
[Please log in to post a comment]


