


using google translate

I received a lot of feedback from the previous project, regarding whether it is possible to add a joystick so I got down to work to see if we can do this and not die trying.
What do we need:
- Read the awesome article by Eugene Andruszczenko(https://github.com/32teeth/html5-plugin-canvas-gamepad).
- Your PICO-8 html cartridge (html and js).
Now a quick lesson of what we are doing:
- 1) Adding the buttons (I add the info on .js of the game):
YOUR_GAME.js
CanvasGamepad.setup({
    start:false,
    buttons:[
        {name:"jump"}
    ]
}); |
- 2) Mapping our controller detection on the game.js (you can found the complete code at the end of this article).
This is the line that make the magic:
game.js
//buttons

                if(map["a"] == 1){SimulateKey(90);}
        if(map["b"] == 1){SimulateKey(88);}
        if(map["x"] == 1){SimulateKey(88);}
        if(map["y"] == 1){SimulateKey(90);}

//joystick
        if(x == 0 && y == 0){
        SimulateKeyUp(37);SimulateKeyUp(38);SimulateKeyUp(39);SimulateKeyUp(40);
        }
        if(x == -1 && y == 0){
            SimulateKey(37);//btn-left
        SimulateKeyUp(38);SimulateKeyUp(39);SimulateKeyUp(40);
        }
        if(x == 1 && y == 0){
            SimulateKey(39);//btn-right
        SimulateKeyUp(37);SimulateKeyUp(38);SimulateKeyUp(40);
        }
        if(x == 0 && y == -1){
            SimulateKey(38);//btn-down
        SimulateKeyUp(37);SimulateKeyUp(40);SimulateKeyUp(39);
        }
        if(x == 0 && y == 1){
            SimulateKey(40);//btn-up
        SimulateKeyUp(37);SimulateKeyUp(39);SimulateKeyUp(38);
        }
        if(x == -1 && y == 1){

        SimulateKey(37);//btn-left
        SimulateKey(40);//btn-down

        SimulateKeyUp(38);SimulateKeyUp(39);
        }
        if(x == -1 && y == -1){

        SimulateKey(37);//btn-left
        SimulateKey(38);//btn-down

        SimulateKeyUp(39);SimulateKeyUp(40);
        }
        if(x == 1 && y == 1){

        SimulateKey(39);//btn-right
        SimulateKey(40);//btn-up

        SimulateKeyUp(37);SimulateKeyUp(38);
        }
        if(x == 1 && y == -1){

        SimulateKey(39);//btn-right
        SimulateKey(38);//btn-down

        SimulateKeyUp(37);SimulateKeyUp(40);
} |
- 3) calling some extra buttons (START button):
if(map["start"] == 1 && banner == false)
        {
            banner = true;
            Module.pico8TogglePaused();

                        //I sent a signal to my "Android" app to show an ad.
                        //Android.startRewardVideoAndroidFunction("");

        }
|
You.- Dude, i´m really don't care about this chit chat.
Me .- Ok, ok, I leave my code so you can steal it https://github.com/demilion/PICO-8-Joystick
(you only need to changes your YOUR_GAME.js and read step one on this article only to be sure you get it).
| ̄ ̄ ̄ ̄ ̄ ̄ ̄ ̄ ̄|
| [Buy me a coffee]() |
| PLEASE!!!! |
| _____ ___|
(\__/) ||
(•ㅅ•) ||
/ づ [i need money]()
https://www.paypal.com/cgi-bin/webscr?cmd=_s-xclick&hosted_button_id=6HMGKKPGQCLBN&source=url
Let me know what you think!!!!!!
https://www.amazon.com/Demilion-Classic/dp/B07S7SLDPZ/ref=sr_1_1?keywords=demilion&qid=1560866513&s=gateway&sr=8-1
 1 comment
using google translate
[tweet]
At the beginning of the year I started using PICO-8 when I found out that Celeste was born from such a simple concept.
The first thing I could discover using PICO is that you can export to html...
if you can use HTML you can visualize it directly on Android using a tool called WebView.
This is a step-by-step tutorial to use your PICO-8 cartridges on your Android phone, let's begin shall we?
What do we need:
- Android Studio(https://developer.android.com/studio/).
- Your PICO-8 html cartridge (html and js).
Now we need to understand what we are going to do:
1) create an application on Android (the classic helloworld: https://developer.android.com/training/basics/firstapp/).
2) Add the WebView tool to your app (https://jgvcodigo.blogspot.com/2017/12/webview-android.html).
3) Add the controls on the html file of your cartridge.
You can use the following template and call your .js file:
https://github.com/headjump/pico8_html_template (awesome morningtoast post: https://www.lexaloffle.com/bbs/?tid=30147)
4)Finally add your html and js file inside your android project:
C: \ Users \ AndroidStudioProjects \ YOUR_PROYECT \ app \ src \ main \ assets
This is the line that made the magic:
myWebView.loadUrl("file:///android_asset/YOUR_GAME.html");
This line sends your html.
MainActivity.java
package com..;
import android.support.v7.app.AppCompatActivity;import android.os.Bundle;import android.webkit.WebView;

public class MainActivity extends AppCompatActivity {

    @Override    protected void onCreate(Bundle savedInstanceState) {
        super.onCreate(savedInstanceState);        setContentView(R.layout.activity_main);
        WebView myWebView = (WebView) this.findViewById(R.id.webView);
        myWebView.loadUrl("file:///android_asset/YOUR_GAME.html");
    }
}
|
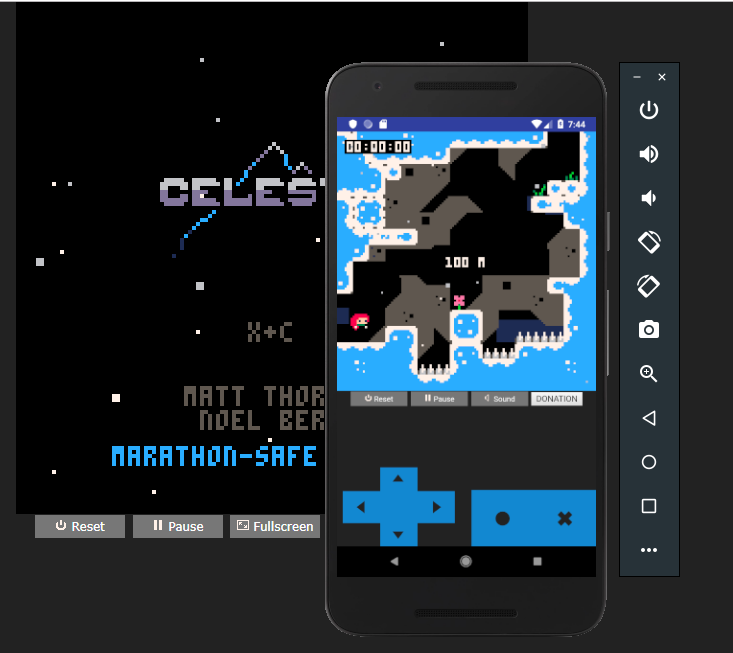
So as you can see we are calling a simple html on android to be able to show our game. It seems the easiest way to have your first android application working.
And you don´t need as much knowledge to publish your Pico-8 game on Google play.
I leave my code so you can steal it https://github.com/demilion/Celeste-Classic-PICO-8-Android
It has a couple of extra lines such as having ads or integrated purchases.
{\__/}
( • . •)
/>♥ u want this?...
{\__/}
( • . •)
♥< \ NoOoOoOoO
{\__/}
( • . •)
/>♥ im joking but Buy me a coffee
Let me know what you think!!!!!!